Lifting Fingerprints:


A technique called vacuum metal deposition (VMD) currently uses gold and zinc to recover fingerprints on items such as glass and plastics. VMD is not a new method of of developing latent prints. Not at all. In fact, it’s been around since the 1970’s. However, its latest use has generated quite a bit of buzz among the fingerprint experts and the law enforcement officials charged with locating criminals.

Now, using VMD, experts are finally able to locate and recover fingerprints from fabrics. And the process is relatively simple. The fabric is placed inside a vacuum chamber where gold is heated to the point of evaporation and then the pressure is reduced, which spreads a very thin film over the material. Then, zinc is heated and attaches to the gold, BUT only in the spots where there are NO fingerprint ridges. What’s left behind is clear fingerprint ridges showing through as fabric. The spaces between the ridges show as a grayish zinc color.

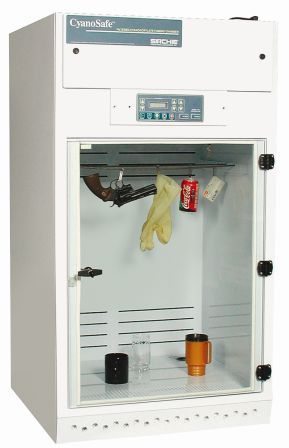
Toronto police lab technician places item in a VMD chamber

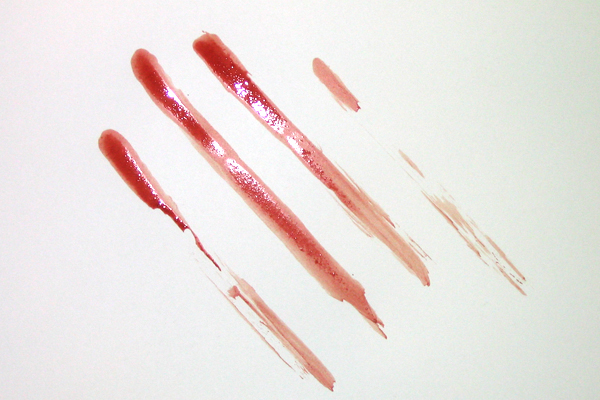
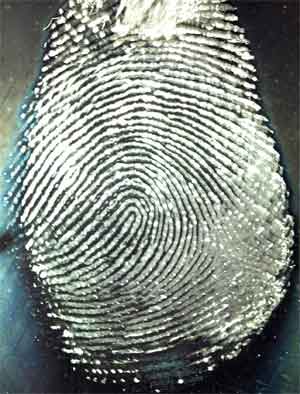
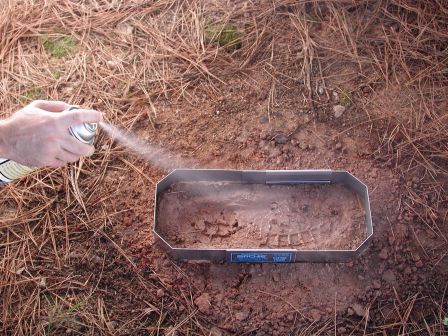
Fingerprints recovered using VMD are photographed, not lifted.

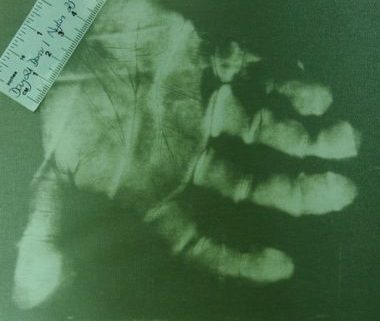
Of course, a fingerprint itself a valuable tool for identification of criminals. But think about how valuable it could be in the case of a victim who police believed jumped to his death from the balcony of a 20-story building. But when scientists run the victim’s clothing through VMD testing, they discover a pair of hand prints on the back of his shirt. Clearly, the presence of those prints would indicate someone had pushed the victim off the balcony. Then, instead of working a suicide case, detectives would then have a murder to solve.

The best types of fabric for turning up positive results are polyester, silk, and nylon.

Another advantage of using VMD is that it can detect prints on items that were previously immersed in water.

background: #bd081c no-repeat scroll 3px 50% / 14px 14px; position: absolute; opacity: 1; z-index: 8675309; display: none; cursor: pointer; top: 276px; left: 20px;”>Save

Friday's Heroes - Remembering the fallen officers


The Graveyard Shift extends our condolences to the families of each of these brave officers.

Deputy Sheriff Dewayne Crenshaw, 62

Tippah County Mississippi Sheriff’s Department

December 3, 2010 – Deputy Dewayne Crenshaw was shot and killed by a male suspect who was involved in a domestic dispute. The fatal shooting occurred after Deputy Crenshaw and another deputy approached the man outside his residence.

Deputy Crenshaw is survived by his wife, four children, and one stepchild. One of his sons is also employed with the sheriff’s office.

Deputy Sheriff Brandon Coates, 27

Orange County Florida Sheriff’s Office

December 8, 2010 – Deputy Brandon Coates was shot and killed during a traffic stop. At some point during the stop Deputy Coates had deployed his Taser while struggling with the driver of the vehicle. Coaters was later discovered with two bullet wounds to the head. He is survived by his wife of about one year. She, too, serves as a deputy sheriff with the department.

It’s frustrating to spend hours, maybe days, working a criminal case only to see your suspect walk out of jail moments after booking is complete. A quick phone call to a bondsman and off they go. Now, if officers had rock-solid evidence, such as DNA, judges wouldn’t be so quick to release offenders back to the streets where they may commit another crime before their court date.

Thanks to Andrew Hopwood at the Forensic Science Service and Frederic Zenhausern from the Center for Applied NanoBioscience and Medicine in Arizona, the days of pre-trial revolving door justice may soon be a thing of the past.

These two scientists have developed an impressive device that allows technicians to simply obtain a cheek swab (DNA sample), test it, and presto…four hour DNA results!

The test is actually fairly simple. As stated, technicians swab the inside of the suspect’s cheek, mix the sample with a solution, and and then place it on a special platform (a chip) inside the machine. The platform (microfluidic platform) extracts the DNA, amplifies it (makes exact copies), and then, through laser electrophoresis (remember, the old method used gels and later a genetic analyzer—still electrophoresis, only slower) the DNA can be compared to a victim, suspect, or other evidence.

And all this is completed in just four short hours! Older methods of DNA testing sometimes required a period of approximately 24 hours simply to extract DNA from the evidence. This method required the sample to soak in an enzyme at least overnight before scientists could begin the actual testing.

Hopwood and Zenhausern are now hoping to reduce turnaround time of their already lightening-fast chip (the platform) and dip (the swabbing) system to a mere two hours!

If only they could do something about the laboratory backlogs

Sexing Skeletal Remains

In the past, experts have traditionally determined the sex of skeletal remains by examining characteristics of the pelvis—the pubis is larger in females; the ischium is larger in males. Simple as that. Or, is it?

Suppose the forensics team has mere fragments to study? What if only a portion of the pelvis is available? How about if they only have as little as fifteen percent of the pelvis?

Well, scientists at North Carolina State University have come up with a better, more accurate method of separating the boys from the girls. They’ve learned that there are 20 distinct areas (landmarks) on a pelvis that can be used for sex determination. This was a huge discovery because it meant that even a small section of a pelvis would contain at least some of those distinguishable trademarks. And, to add to this icing on the cake, the new method touts a 98% accuracy rate as compared to a 90% success rate using the standard method of visually examining the bone(s).

Now to be a little more specific about how the process works (easy as 1-2-3). First, a 3-D image is fed into a digitizer, which measures the landmarks on the bone fragment. Then those measurements are compared to a standard. Next…the results. It’s a girl! Pass the cigars.

This new development is terrific news for prosecution and defense teams. Not only do each of them have more accurate results to present to judges and juries, they no longer have to rely on opinion. Defense attorneys won’t need to try and make the forensic anthropologist look like a babbling idiot, and the prosecutor won’t have to make them out as gods. It’ll all boil down to the reliability of a computer and the research of two North Carolina State scientists—Dr. Ann Ross and Dr. Joan Blytheway.

Dr. Ann Ross, on right, with students at NC State

But, this may have all been a huge waste of time. All anyone had to do was ask any teenage boy to identify the bones. After all, they’re pros at determining sex by examining hips.

DNA not always squeaky clean


Problems exist in every aspect of our lives. No, our world is not perfect, but we do the best we can with what we have. But there’s trouble everywhere. Toyota is recalling hundreds of vehicles. A brand of over the counter medicine has some sort of funky odor and shouldn’t be consumed. Produce is contaminated with deadly bacteria. A major oil company is killing the entire Gulf of Mexico and everything around it. Russian spies. Politicians. Even our criminal justice system is faulty, including the Golden Child of forensics, DNA.

Wait! Did I say DNA is faulty? Surely, that can’t be true…

But it is, and here are a few problems associated with DNA testing that could cause real trouble for prosecutors.

1. Mixtures – When more than one person’s DNA comprises a single sample, then three or more alleles (one of two or more alternate forms of a gene) could be found in at least one location on a chromosome. In short, a mixture of DNA can be confusing and is subject to multiple interpretations, which equals reasonable doubt. And reasonable doubt could result in letting a guilty person off the hook.

2. Degradation – DNA samples can degrade when exposed to harsh conditions. Samples may also deteriorate with age. The electropherogram plotting below shows the reduction in peak (the individual markers that set each person apart) size with degradation of the DNA sample.

3. Stutter peaks – Stutter peaks are little blips on the *electropherogram. These “false peaks” are actually caused during PCR (DNA copying process) and show up as a larger or smaller duplicate of the actual fragment. They’re not real, but they’re there, which allows a defense attorney to cry reasonable doubt.

4. Blobs and Noise – During the process of DNA testing, DNA is separated and the tiny pieces are dyed so they’ll show up (That’s not quite right, but it’s the best simple explanation I could come up with. It’s close enough). Sometimes extra globs of dye (remember, these are tiny, tiny bits of dye) bind together and as they pass through the genetic analyzer they show up as their own peak. This can be quite bad since the extra peak combined with the real peaks could mimic someone else’s DNA.

Air bubbles and minute particles of whatever (dust, debris, etc.) could pass through the machine creating “noise” which also appear as odd peaks. An expert would probably recognize the blobs and noise for what they are, but again…reasonable doubt.

So, as you see, DNA is not an exact science. It’s very close, but there is definitely enough wiggle room for error. And that’s all a good defense attorney needs to cry foul. However, not every defense attorney is familiar with DNA testing and the errors that could result from the various problems. Of course, these aren’t the only problems that could occur with DNA testing. For starters, there’s the evidence collection/contamination by police officers and evidence technicians. But that’s a story all it’s own.

* An electropherogram is basically a computer printout of DNA.

background: #bd081c no-repeat scroll 3px 50% / 14px 14px; position: absolute; opacity: 1; z-index: 8675309; display: none; cursor: pointer; top: 228px; left: 20px;”>Save

Since not all blood deposited at crime scenes is spatter, investigators now call this extremely valuable evidence, “bloodstain.” Detectives can learn a lot from studying bloodstain patterns, such as what type weapon was used to deliver the fatal blow, the manner in which the victim was killed, where the assault took place, and where the attacker stood when he committed the act. They learn these things by studying the shapes of the blood drops and droplets, the location of the blood evidence, the patterns made by the spatter and stain—generally, what happened to the blood when it was released from the victim.

A good bloodstain training class uses actual human blood, because nothing else accurately mimics the real stuff. Although, a decent substitute is a mixture of Karo syrup and red food coloring. During training classes students are exposed to nearly every type real-life scenario imaginable, but the first order of business is to learn the basics—characteristics of a blood drop.

– blood drops are formed by gravity

– blood drops cannot break apart unless contacted by an outside force

– larger drops travel further than smaller drops (due to mass, not size)

– blood drops always travel in an arcing path

– size ranges from a few millimeters to few centimeters

– volume of a drop of blood is in direct proportion to whatever it’s dropping from (ax, stick, arm, leg, etc)

Crime scene investigators only measure bloodstains that hit surfaces on the way up, never stains made by blood that’s on its way back down. Stains made when traveling upward are much more accurate for use as evidence, because gravity is not as much of a factor in the pattern’s formation.

Types of Bloodstain Patterns

Impact – caused by high-velocity or medium-velocity wounds—gun shots or blows by an object such as a baseball bat or hammer.

Swipes (Wipes) – Caused by a bloody object being wiped across another surface (these stains are the reason from changing the name from bloodspatter to bloodstain).

Cast-Off – Caused by slinging blood off objects in motion (a swing of a bloody hammer, or arm).

Drip and Flow – Caused when blood drops off one object onto another.

Projected – Caused by arterial spurts. Often seen in stabbings and cuttings.

*Images provided by HemoSpat.

Combination rifle and shotgun


Rifling is the term used to describe the twisting pattern of grooves and lands (raised areas between grooves). Lands and grooves are tooled into steel gun barrels to cause the projectiles (bullets) to spin. The spinning movement stabilizes the bullet, causing it to travel straight and true, sort of like how a football spins when thrown by a quarterback.

Gun barrels start out as solid pieces of steel.The center hole is cut using a drill. Then, the rifling pattern is tooled to the inside of the barrel.

A tool, such as the one pictured above, is forced inside a newly drilled gun barrel, cutting lands and grooves as it passes through.

When a barrel is manufactured, marks caused by contact with machinery are left in the steel. These blemishes are different on each barrel, causing individual guns to have distinguishable fingerprints. No two set of markings are the same. Also, normal use of a firearm can cause distinctive markings inside the barrel.

Bullets are made from soft metal, such as lead. As they pass through a rifled barrel, the imprint of lands, grooves, and tooling blemishes are permanently stamped into the projectile.

Investigators use each of these markings to match bullets with the gun that fired them.


Spiral pattern of lands and grooves


Bullet with impressed image of lands and grooves in its surface

Gun stuff for fun…

Caught by surprise


Better prepared


Don’t monkey with me.


No way I’m hunting with Dick Cheney.


I told you I’m sick of canned food. I want real fish, and I want it NOW!

For those of you who couldn’t make it, Forensic University hosted a day at the gun range for members of Sisters in Crime.

The new Bond.

* BREAKING NEWS *

POLICE PROCEDURE AND INVESTIGATION has been nominated for a prestigious Macavity Award! I’m truly thrilled and humbled to be included with such a star-studded group of authors. What an incredible honor. Thanks so much!

Fingerprinting


The process of fingerprint fuming is relatively easy. All that’s needed to perform the technique is a fairly airtight tank, some heat, and a few drops of Superglue.

Fingerprints leave behind traces of amino acids, fatty acids, and proteins. Those ingredients, combined with the moisture that’s found naturally in the air, react to the fumes produced when Superglue is heated. That reaction forms a sticky, white material that clings to the ridges of fingerprints, making them visible.

Detectives take photographs of the chemically developed prints for entry into AFIS and for use as evidence in court.

superglue11.jpg

Detectives use the same glues found in retail stores for use in fuming chambers.

cynosafe.jpg

CynoSafe Fuming Chamber

Items to be printed are placed inside an air tight fuming chamber, such as Sirchie Fingerprint Laboratory’s CyanoSafe. A few drops of Superglue are placed into a heating tray inside the chamber. The glue is heated which releases its vapors into the air. The CyanoSafe is designed to provide the ideal humidity level for the development of fingerprints.

The machine automatically purges the fume-laden air from inside the chamber after the process is complete. Tabletop models, like the one pictured above can cost anywhere from five-thousand to ten-thousand dollars. There are portable units available that’re made from heavy plastic. These units are collapsable for transporting to a crime scene. The costs for the portable units start at around one-hundred-fifty dollars.

Fingerprint developed using Superglue

In many cases, officers don’t have the necessary resources available to conduct their own print development; therefore, they must send the items they’d like printed to an outside laboratory. As a result, prints are often destroyed or wiped away during the trip to the lab. To reduce the risk of destroying a print, it should be fumed – preserving the print – prior to placing the item in a package for the trip. Without the proper equipment, this is impossible.

* Many police departments do not have the funds to buy expensive fuming equipment; therefore, detectives are sometimes forced to become a bit innovative by making their own crude fuming chambers out of glass aquariums, Rubbermaid bins, and even cardboard boxes lined with aluminum foil. Costs – a few dollars. Results – same. Danger to detectives from toxic fumes and burns – high.

Maybe writers should adopt a needy police department, take up a collection, and purchase them a nice fuming chamber.

FYI – Here’s a link to an interesting article on The Boston Channel. It about stupid crooks cutting off their fingerprints to avoid jail time.

http://www.thebostonchannel.com/news/15478914/detail.html

If the Shoe Fits

Detectives look pretty darn silly walking into court carrying a pair of plaster footprints. But, footprint and tire impressions can be extremely helpful to an investigator’s case. They’re especially helpful when the casts are a perfect match to the shoes the defendant chose to wear to the hearing. Yep, that’s actually happened.

Collecting impression evidence isn’t all that difficult, even in mud and snow, if you’ve got the proper tools. Here’s a look at the process of collecting footprint evidence.

Investigators usually keep an impression casting kit in the trunk of their police car.

Impression casting kits contain a casting material that’s similar in composition to the material dentists use when making impression molds for dentures.  The kits also contain dust, dirt, and snow hardener.

dirt-spray.jpg

Dust and dirt hardener firms up loose soil.

snow-spray.jpg

Snow impression wax prevents snow from melting during the casting procedure.

sp1000-pouring-compound.jpg

Casting powder is mixed with water and then poured directly into the impression.

csi-footwear1.jpg

Hardened cast of suspect’s footprint.  The cast is used to identify a suspect’s shoes by size and unique characteristics, like cuts and indentations.  The cast also becomes part of the evidence that’s used in court.